Uploading images from external devices via WebRTC 2023
Today, we want to introduce you to one of our latest features, which we are particularly proud of: the external or smartphone upload of images. In this blog post, we will show you how we implemented this feature using WebRTC and how it can make the lives of our users much easier. So, let’s dive right in and explore the world of client-peering and interactive device communication!
We have utilized these libraries for this feature, which we can more or less recommend:
- peerjs - for client communication
- peer - server to establish the initial connection between clients
- typescript-json-schema - generate validation schemas from our type definitions
- jsonschema - validate data from the generate schema, that is exchanged between the clients
WebRTC Basics
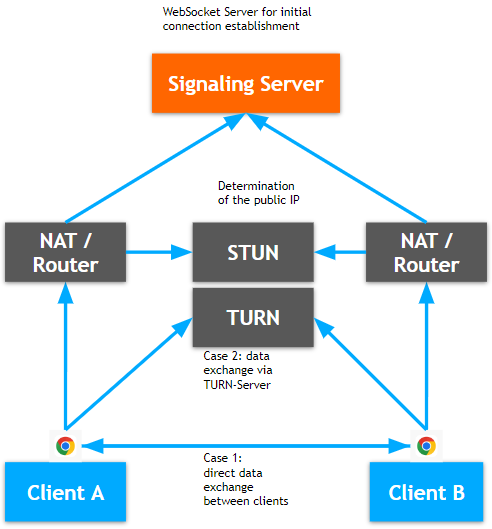
There are several benefits of using WebRTC as a communication layer for real-time data transfer. Firstly, it is a peer-to-peer communication protocol, which means that data is exchanged directly between devices without the need for intermediate servers. This reduces latency and improves the overall speed and efficiency of data transfer. Secondly, WebRTC is secure by design, as it uses end-to-end encryption to protect data in transit. Finally, WebRTC is cross-platform and can be used on various devices, including desktops, mobile devices, and even IoT devices, making it a versatile technology for many different use cases.
Now, let’s dive a little deeper into how WebRTC works. WebRTC consists of three main components: the getUserMedia API, which allows browsers to access media devices like cameras and microphones; the RTCPeerConnection API, which establishes a direct peer-to-peer connection between devices; and the RTCDataChannel API, which allows for the transfer of real-time data. When two devices want to communicate, they exchange information about their network configurations, including IP addresses and firewall settings. Once this exchange is complete, the devices can establish a secure connection and start exchanging data in real-time.
Overall, WebRTC is a powerful and versatile technology that can be used for a wide range of real-time communication and data transfer use cases. Its peer-to-peer architecture, end-to-end encryption, and cross-platform compatibility make it an attractive choice for developers looking to build fast, secure, and scalable applications. Creating an interactive user interface that seamlessly connects multiple devices is an integral part of our plan to deliver exceptional features in the future, including collaborative working.
Client-Peering Module: A Publisher-Subscriber Pattern for WebRTC Connections
We separate our implementation for this feature into two modules. The first module is the client-peering module, which generally adds the publisher-subscriber design pattern upon the peerjs library. We also included connection management like using bi-directional connections if possible, re-connection if it’s lost and re-setting the time-limited credentials for the TURN-Server. We also decide that each subscriber has to implement some validation logic for the incoming data, and this module only processes the data if it passes validation. Otherwise, the system logs the data because it may be a XSS-Attack. (or there may have been an error during the implementation phase :D)
Here’s a quick overview of the API we created:
type UUID = string

type Timestamp = number

// Definition of all (unique) event-names defined in the application
enum PublishEventNames {
    HELLO_WORLD = 'hello-world'
}

// from the publisher perspective he should provide the following information
interface PublishEventRequest<T> {
    eventName: SynchronizeEventKey
    data?: T  // data, if necessary provided to all subscribers from a client
}

// as a subscriber the published data will be extended with some internal metadata
interface PublishEvent<T> extends PublishEventRequest<T> {
    sourceId: UUID // the client id where the event initially comes form
    timestamp: Timestamp // unix timestamp when the event was published
}

// a subsciber is basically the unit that processes the data for a given published event
interface Subscriber<T> {
    eventName: PublishEventNames, // eventKeys that a subscriber has its subscribtion
    notify: <T>(event: PublishEvent<T>) => void, // is called when validate is true - and should contain the data processing
    validate: <T>(publishEvent: PublishEvent<T>) => boolean,  // validation of the received data
}

interface WebRTCClient {
    connect: () => boolean, // connection will also be established before sending data
    disconnect: () => void, // for whatever reason the connection to the signaling server should be disconnected
    addPeer: (eventName: PublishEventNames, receiverPeerId: UUID) => void, // register a peer for broadcasting for the given event
    removePeer: (eventName: PublishEventNames, peerId: UUID) => boolean, // remove a peer from broadcasting-list for the given event
    subscribe: <T>(subscriber: Subscriber<T>) => void, // subcribe for a specific event
    unsubscribe: <T>(subscriber: Subscriber<T>) => void, // unsubscribe for a specific event
    publish: (publishEventRequest: PublishEvent<T>) => Promise<Awaited<void>[]>, // publish / broadcast to each registered peer for the event
    publishTo: <T>(publishEventRequest: PublishEvent<T>, peerId: UUID) => Promise<Awaited<void>> // publish an event to a specific other client
    peerId: UUID // own client id e.g. for creating an url that can be shared with another device to connect
}
Example Usage
To give you an idea of how to use this API, here’s a simple example: (pretty much code for just a console.log :D)
// Set up & additional types
const webRTCClient: WebRTCClient = WebRTCClientFactory()
client.peerId = 'client A' // for presentation purposes only

interface HelloWorldData {
    message: string
}
const HELLO_WOLRD_MESSAGE = 'How are you?'

// processing incoming messages
client.subscribe<HelloWorldData>({
    eventKey: PublishEventNames.HELLO_WORLD,
    notify: publishEvent =>
        console.log(`received event "${publishEvent.eventName}" from "${publishEvent.sourceId}": ${event.data.message}`),
    validate: publishEvent => publishEvent.data.message === HELLO_WOLRD_MESSAGE
})

// creating outgoing messages
const myHelloWorldEvent = {
    data: { message: HELLO_WOLRD_MESSAGE },
    eventName: PublishEventNames.HELLO_WORLD
}
client.publishTo(myHelloWorldEvent, client.peerId)

// console output
// received event "hello-world" from "client a": How are you?
External Upload Module: Bring your newly connected devices to life!

In our second module, we’ve successfully implemented a process for uploading images from external devices. Users can now easily upload photos from one or multiple external devices to their account. We’ve achieved this by utilizing the client-peering module that we previously described, which enables seamless communication between devices.
To make this feature more user-friendly, we plan to develop an asynchronous upload function in the future. However, for now, users must remain active in their account/browser to upload photos from external devices while taking IT security into consideration.
This new feature will be especially useful for users who have taken photos with their smartphones and want to create personal photo products on their computers without the need for additional technology such as Bluetooth or cables.
Lastly, we must mention how enjoyable it is to experience the interactive interplay between devices and the mutual UI updates. It’s not just useful, but also entertaining! :)

Improving Security in WebRTC
There are numerous of security concerns, if we use technologies for connecting clients to each other directly. In this article we just focus on those were we activly did something to improve the security, because some network and browser built-in zero-configuration feature help us as developers to prevent from making mistakes or exposing sensitive data - like DTLS (encryption on datatransfer) or Multicast DNS (DNS on local networks).
Using SSL for Signaling Servers
At the core of our commitment to the security of our WebRTC stack is the implementation of SSL for our signaling servers. This step is particularly crucial because in certain instances, encryption keys may be transferred to other participants through the signaling server.
With SSL, we guarantee the transmission of these keys occurs safely and securely without the risk of exposure to potential attackers. By using this standard, we can rest assured that the privacy and security of our users’ information is always maintained.
Securing Against Cross-Site Scripting (XSS) with JSON Schema
Safeguarding against cross-site scripting (XSS) attacks is a top priority for us when it comes to ensuring the security of our WebRTC platform.
To accomplish this, we utilize UUIDs as unique identifiers for each participant who wishes to connect, making it significantly more challenging for attackers to target specific users.
Furthermore, we take an additional step to validate all data sent between clients to guarantee it’s legitimacy and safety. We achieve this using JSON Schema, which is a simple and declarative method of attaching metadata to various data types.
As an example, we may create a validation schema similar to the following:
// provide validation rules to your types
/**
 * @TJS-pattern ^[0-9a-f]{8}-[0-9a-f]{4}-[0-9a-f]{4}-[0-9a-f]{4}-[0-9a-f]{12}$
 */
export type UUID = string

/**
 * @minimum 0
 * @maximum 8640000000000000
 */
type Timestamp = number

enum EventKey {
    HELLO_WORLD = 'hello-world'
}

interface PublishEvent<T> {
    eventKey: EventKey
    sourceId: UUID
    timestamp: Timestamp
    data?: T
}

/**
 * @TJS-pattern ^([a-zA-Z0-9|.|,|-|+| ]+)$
 */
type NoSpecialCharacters = string

interface HelloWorld {
    message: NoSpecialCharacters
}

type HelloWorldEvent = PublishEvent<HelloWorld> & {
    eventKey: EventKey.HELLO_WORLD
}
Following that, we only have to generate the schema e.g. with typescript-json-schema, and check all incoming data against the generated schema for each type of event.
// autogenerated schema output
const schemas = {
    HelloWorldEvent: {
        additionalProperties: false,
        type: 'object',
        properties: {
            sourceId: {
                pattern:
                    '^[0-9a-f]{8}-[0-9a-f]{4}-[0-9a-f]{4}-[0-9a-f]{4}-[0-9a-f]{12}$',
                type: 'string',
                title: 'sourceId',
            },
            timestamp: {
                minimum: 0,
                maximum: 8640000000000000,
                type: 'number',
                title: 'timestamp',
            },
            eventKey: {
                type: 'string',
                enum: ['hello-world'],
                title: 'eventKey',
            },
            data: {
                type: 'object',
                properties: {
                    message: {
                        type: 'string',
                        title: 'message',
                        pattern:
                            '^([a-zA-Z0-9|.|,|-|+| ]+)$',
                    },
                },
                additionalProperties: false,
                required: ['message'],
                title: 'data',
            },
        },
        required: ['eventKey', 'sourceId', 'timestamp', 'data'],
        $schema: 'http://json-schema.org/draft-07/schema#',
    }
}
Troubleshooting in Client-Only Connections
We know that debugging can be frustrating, especially in the WebRTC environment. Unlike traditional client-server models that are relatively straightforward, WebRTC connections are a different beast altogether. Here are some of the most challenging parts for us.
The Challenges of WebRTC Troubleshooting
In WebRTC, participants connect to each other using dynamically generated IDs. This means that if a client loses their internet connection, their ID may be re-assigned to another participant, causing confusion when they try to reconnect. It’s like dynamically changing endpoint URLs for exchanging data between client and server.
Additionally, while HTTP/S ports are the standard for surfing the internet, WebRTC’s low-latency requirements make it more lightweight and reliant on UDP. This can lead to more complex setups involving STUN and TURN servers.
Components of WebRTC Connections
Unlike traditional client-server models, WebRTC involves two clients, a signaling server, and a STUN/TURN server. This added complexity can make troubleshooting a real headache. For troubleshooting on network issues it is necessary to understand, what way the data has been sent. Is there an issue connecting through local or public IP, maybe there is a UDP block in one of the clients? Is the TURN-Server used? Maybe the time-expiry credentials are no longer valid?
The Importance of Logs
In traditional client-server models, centralized logging is standard practice. Unfortunately, this is not the case in client-only connections. As developers, we have to add logs to our code to track down issues.
One approach we’ve taken is sending WebRTC history reports to our Kibana dashboard. This gives us a better idea of what’s happening before a problem occurs.
Conclusion
In conclusion, we are pretty much excited about the potential of WebRTC technology and its possibilities for enabling new forms of collaboration and communication. However, we are also mindful of the increased complexity and potential security concerns that come with its use. As we continue to explore and experiment with WebRTC, we are excited to see what new applications and use cases will emerge, especially in the realm of collaborative working.
We hope that the learnings and experiences we have gathered through our implementation process will prove beneficial to you. We aim to share our passion and ignite curiosity in exploring this dynamic and amazing technology. Be sure to stay tuned for more updates and insights on WebRTC and its future.